A2: Laser Cut Object
- alidatm
- Feb 3, 2022
- 6 min read

Updated: Feb 7, 2022
Alida Muongchan

Task
During this week, we were tasked to design and build a 2 1/2D object using a laser cutter, meaning that the laser cutter can operate more than in just 2 dimensions. This challenge was to design and build an object that we could use in our prototyping work, which is a tool for the process. Though there were many fun and creative choices, I decided to choose a laptop stand to elevate my laptop! As a student, my laptop is a tool that is essential to my daily productivity. Because I use it every day, my posture does suffer a bit, especially my neck as it is always positioned downwards at a lower level. By elevating my laptop stand to eye level, it can help to improve as an ergonomic design as well as comfortability.
Requirements
must be cut from a single sheet of 18" x 24" chipboard (which you may purchase from the MILL)
must not use any glue, tape, or other fastening materials to assemble and use
must be able to be dissembled into pieces that can be stored flat and transported (as in a backpack)
Design
Inspiration
In the beginning, it was difficult to get started because I wasn't sure exactly where to start. The requirements were vague but it really gave room for creativity. Because I wasn't sure where to start, I took it up to google to look up designs and search around for inspiration on designs and structure for 16 in laptop stands.
There were many great ways to make a laptop stand but most of them I didn't particularly favor based on either aesthetics or concerns about structural integrity because my laptop is fairly bulky and heavy. I had to design it in a way that the items are flat and transportable, but also easy to assemble in a 3D structure without glue or tape.
After surfing around websites and videos, I found a design that I really liked and took heavy inspiration from (Figure1). If I could I would have wanted to make it exactly like this but it didn't show the instructions of how nor was I confident enough to mimic without putting risk on my laptop, so I sketched it from scratch and made adjustments to fit.

Figure 1: Laptop Stand on Youtube
Sketches & Iterations
When beginning to sketch {Figure 2) , I took notes of measurements of the laptop so that it would later be easy to incorporate into sketching on Figma and adobe illustrator. I tried different methods of sketching first then looking at inspiration online and vice versa. I definitely found it easier to sketch after looking at ideas but I was also cautious of wanting the design to be somewhat original. There were two main structures that I considered, and that was either to have the laptop be supported from the middle to out or to opt more for the outside. This means the design was either going to be with all four sides or using two pieces and intersecting to make an X shape. My main focus and considerations were being mindful of material, cost, structure, and aesthetics. I wasn't able to do too much research into it based on time constraints. Eventually, I came to the four pieces for aesthetics and structure because I had a strong bias towards the design in Figure 1.
The length of the stand will sit about 3.5 ft tall, and long and wide enough to hold the 16 in laptop.

Figure 2: Sketches & Iteration
After having an idea and the direction of where I wanted to go, I started sketching on Figma. I chose Figma because it was a free alternative to Adobe and I have more familiarity though I wish I did have Adobe. I've actually never worked with vectors and there was a bit of a learning curve. This definitely took longer than I expected. I tried to keep it to the minimum and bare-bones to work quickly, but it took hours to even create a simple sketch. I wanted a smooth and organic, but symmetrical shaped design and tried to minimize and save material. the rectangles were added to create an interlocking system that could be put together and taken apart to satisfy the 2D to 3D requirement. The curved corners on the top were meant to hold the laptop in place and can prevent moving and sliding. Once I had a shape and design that I liked, I copied and pasted.

Figure 3: Vector Sketch
When I had the blueprints and templates finished, I was ready to laser cut at the mill however, I ran into a slight issue between converting between Figma (Figure 3) and Adobe Illustrator. There were issues with actual measurements when converting platforms, as well as issues with point size. I ended up importing the .SVG file to Adobe and tweaking from there. During this process, I realized some of the measurements were wrong and had to make major adjustments. Because the laptop isn't exactly a square, the lengths of the pieces shouldn't be exactly the same. I shrunk the size and resized the boxes that interlock. The idea was to make it fit securely so that it could be picked up in one piece. I would insert a snapshot of the final blueprint but I forgot to save a copy from the mill laptop!
Prototyping
Pre-Prototyping
Before I did the final print, I did a short and sweet prototype with regular printer paper to be able to visualize the interlocking mechanism of the wooden boards. This involved cutting slits and locking the paper creating a mini structure that I, unfortunately, do not have a photo of but can be imagined!
Final Prototyping

Figure 4: Wood and Laser Cutting
The mill ran out of 18 x 24 in wood, so I had to opt for 12 x 36 in to move around and print. As it was cutting, I was really worried that the sparks would set the wood on fire and my entire project would be ruined but thankfully that wasn't the case. Once it was done, I was able to pop out the pieces of wood to create these wooden skeletons. The only part that I was really concerned about was the fitting of the intersection mechanism and I was worried if they were going to fit or stay. For those specific parts, I winged it and cut even boxes and hoped that they interlocked correctly.

Figure 4: Wooden Stands
This was the coolest process ever!! I wish I took pictures of when the laser cutting was happening but I was too mesmerized. The cutting took about 15 minutes to cut these pieces and it was really exciting to see something created from scratch on digital paper, become tangible and in the physical world, super rewarding.
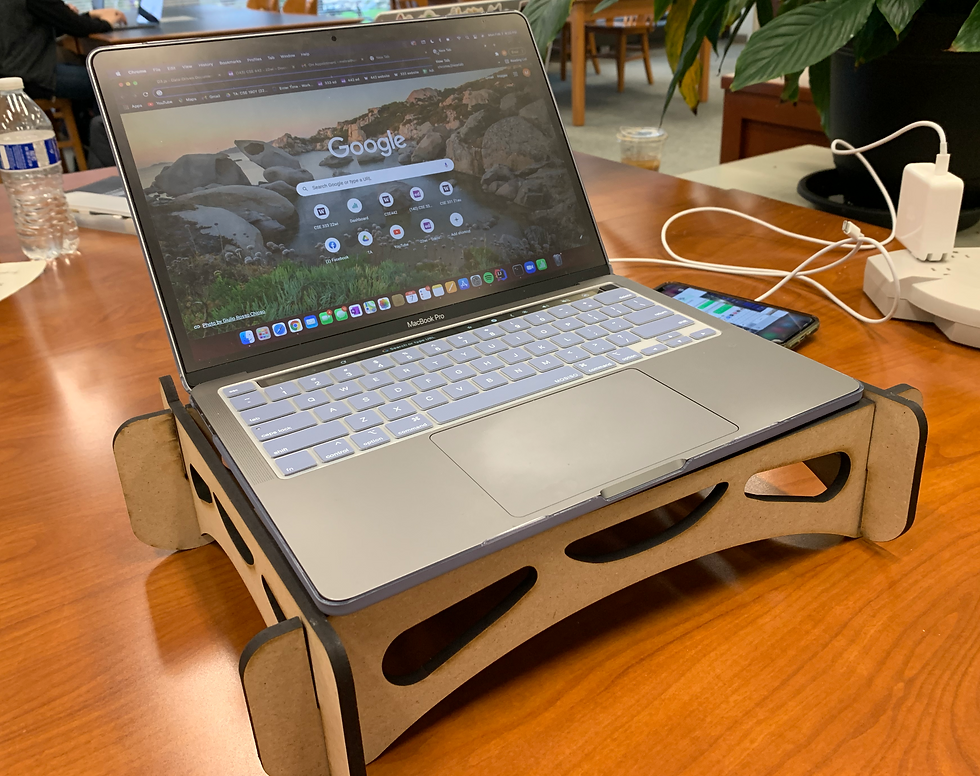
Figure 5: Finished Product
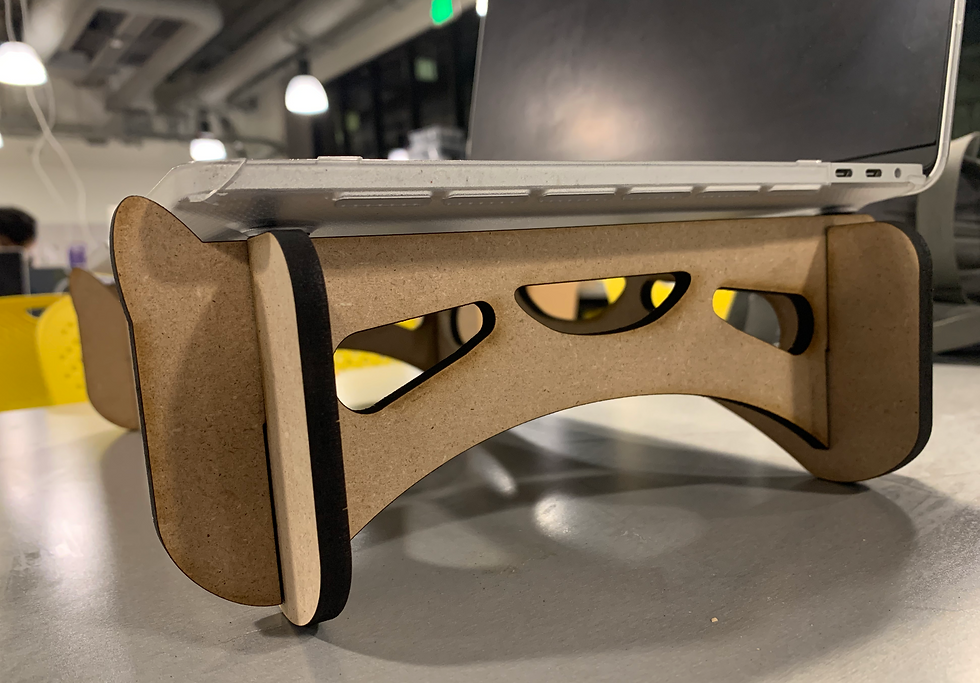
Figure 6: Finished Product
Testing
I wanted to keep the testing simple and open without many hints so I only said:
"This is a laptop stand, please put it together."
Video Demo
Analysis
What Worked Well
I think overall the laptop stand worked surprisingly well.
It's able to hold a 13,15, and 16 in laptop and elevates it to eye level pretty well.
The design also allows for airflow so that the laptop is able to circulate and flow the air
Critiques
It was as I had suspected, the intersection mechanism was a little loose and not the ideal way to hold the pieces together
You are also only able to carry it from the bottom pieces and not the top pieces or else it would fall apart
All four underpads of the laptop had to be positioned precisely on the four corners of the stand or else it could fall through.
Reflections and Improvements
Next time I would definitely do more research on an interlocking mechanism or change the thickness of the cuts so that they would stay
I would potentially put a board under the four pieces to secure the stand even more because there was leftover pieces of the wood afterwards that could be used
If I were well versed enough in laser cutting, I would create a hinge design to be able to fold or manipulate the material easier
Again this was super fun to do and I really enjoyed the physical aspect of creating from a design. I'm excited that I got to work with a new machine as a skill. It was quite the learning curve to come from absolutely nothing to building to print from a laser screen but the creative process is something to be practiced and enjoyed!


Comments